UK: +44 (0) 8455 441 441
Ireland: +353 1 531 4450
Saudi Arabia: +966 (11) 920 007299
What is Microsoft Power Automate and how do I use it?
What is Microsoft Power Automate and how do I use it?
Microsoft just announced the general availability of its new Azure-based workflow engine, Microsoft Power Automate. It’s designed to connect different online services to pass data between them, or do work on that data. For example, if someone fills out a form in SharePoint, you could use Microsoft Power Automate to create a new Lead in Dynamics 365. But it’s not limited to only Microsoft services. You could just as easily pull information from Facebook or push files into Dropbox using Power Automate. The key feature is connecting systems to enable your business to work. While not strictly a Dynamics release, Power Automate promises to bring a lot of power and flexibility to Dynamics 365, and how it interacts with other services.
One major part about Microsoft Power Automate is it’s designed to be used by power users, not developers. In fact, the user interface is nicely visual, and users are guided through each step of creating a Power Automate. Microsoft also offers a large set of templates to start from, like the one below, which creates a list item in SharePoint whenever a record is created in Dynamics 365.
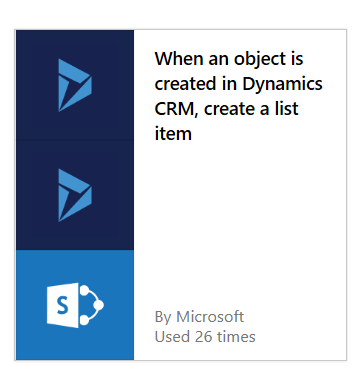
Figure 1 Microsoft Automate Template (note, some templates still say CRM instead of 365)
But it’s not limited to what Microsoft offers. Automate offers the option for your developers to write custom services for your users to use. For example, if you have an internally-built application you would like to pass data to and from, your developers could build an Automate service endpoint that would then be visible to power users. The other advantage is that Automate is based on Azure Logic Apps. So, if an Automate ever gets more complex or custom than what can be configured from the Automate tool, your developers can take control of the Flow, migrate it to Azure Logic Apps, and work on them in Visual Studio. This kind of hand-off means that Automate that become business-critical won’t be abandoned just because the requirements outgrow the original creator.
How do you use Microsoft Automate?
That’s a nice theory, but let’s assemble an example Automate. In fact, we’re going to do something in Flow that can’t easily be done in Dynamics 365. We’re going to update child Contact company phone numbers when the parent Account’s company phone is updated. To do this in Dynamics 365 directly would require either building a custom workflow, or using a plugin. But we’re going to use Flow to do it with no code.
First, navigate to https://flow.microsoft.com/en-us/ and log in with your Office 365 account or personal Microsoft Account (note, if you want access to your organization services, you’ll need to use your organization account). Once your account has been created, you’ll see a “My Power Automate’s” link. Click there and then click “Create from blank” (the templates are very useful, but we want to start from scratch).
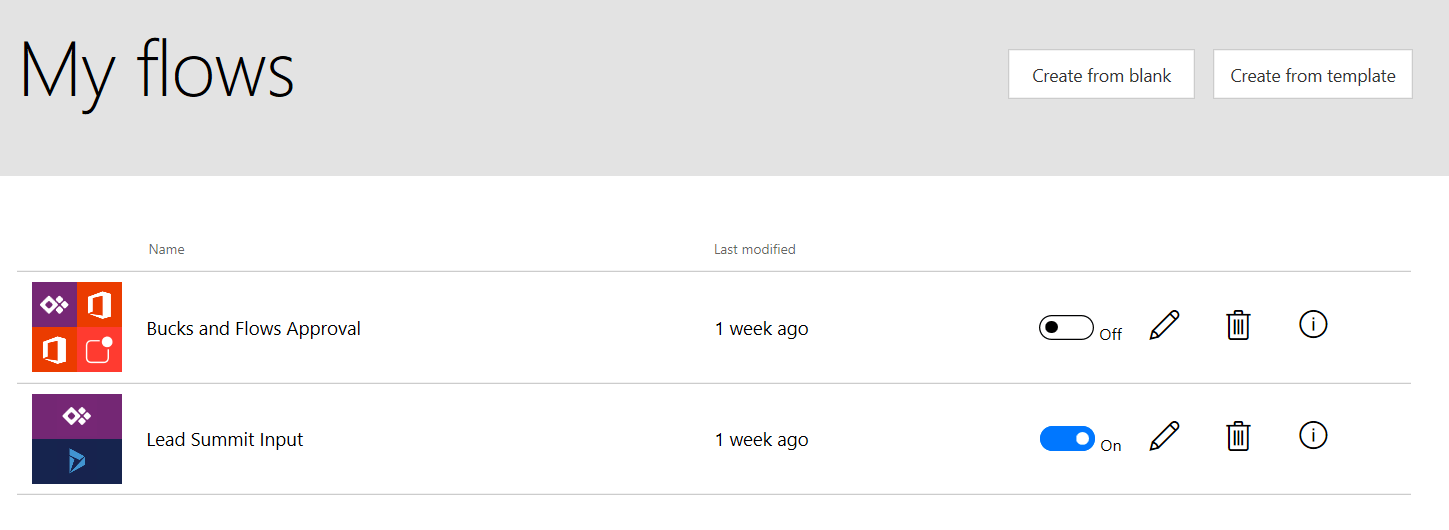
Figure 2 My Power Automate
The search box is a quick and effective filter, so type “Dynamics 365” and click “When a Record is Updated”.

Figure 3 Filtering Services
Power Automate will then move to the Creator page. First, title your Automate. If you haven’t already connected, it will ask you to verify your account for Dynamics 365 (and if you’re using any third-party services, you’ll need to log in and authorize them with Flow). Then choose your Dynamics organization and the entity you want to look for updates on. In this case, I am using our Sandbox Dynamics 365 and want to check for changes on the Accounts record. As we don’t need any of the advanced options, all we need to do is click “+New Step”
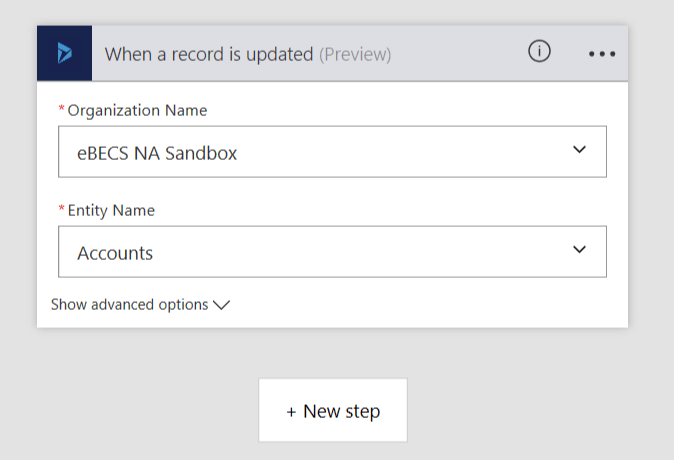
Figure 4 On update of an Account
Now we need to get our list of Contacts where this updated Account was the Parent Account. Like before, add a new step for Dynamics 365, but choose “List Records” Keep the source the same as the Dynamics 365 instance we’re already working, and choose the entity name of “Contacts”. This time, we are going to need to go into advanced options, because we need to filter by the Account that was updated. The Filter Query works like OData Filters. If you aren’t familiar with them, odata.org has tutorials for filters and orderby to help build basic queries (http://www.odata.org/getting-started/basic-tutorial/#filter). Most of the time you shouldn’t need to build filters like here, but it’s nice to know it’s possible. The tool CRMRestBuilder might also be helpful if you end up needing more complex filters (https://github.com/jlattimer/CRMRESTBuilder).
For our specific filter, we need to look at the parent account. We want to use the unique ID instead of just the name, because there is no guarantee Account names will always be unique, but the GUID will be. We need to know some of the schema for Dynamics 365 for this filter. If you don’t know what the internal schema name is for a field, you can go in Dynamics 365 to Settings -> Customization -> Customize the System. Go to the entity you need to get schema information on (in this case Contacts), then to the field list. That list will have both the display name and the schema name so you can easily look for the field you need. In our case, we need the Parent Account. The schema is “parentcustomerid” for that lookup field. Then we need the value of it to compare to the value of the Account that was recently updated. So our filter will look like _parentcustomerid_value eq (for equals) Account. The image below shows that the last “Account” is a link to the previous step that you click to add. So while you still had to make the core filter, there is no ambiguity when referencing previous steps in your Automate.
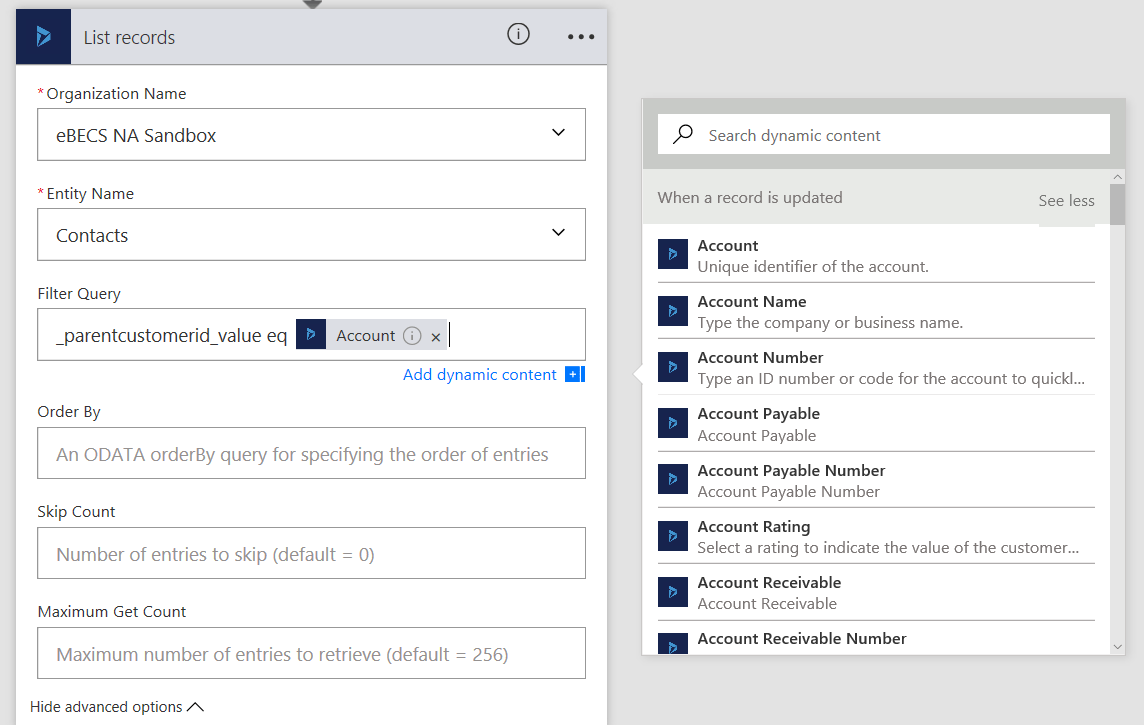
Figure 5 Listing Contacts with an OData filter
That’s it for listing all the Contacts related to the updates Account! Hide the Advanced Options and click +New Step. This time, we need to use “More” and a new option called “Add an Apply to Each”. What this will do is allow us to iterate through that list we just created until we’ve updated each Contact.
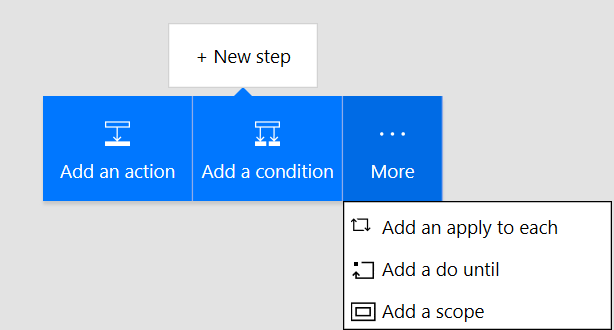
Figure 6 New Step to create Apply to Each
There is only one valid list to work on in our current Automate, so select “value” in the Output field, and then click “Add Action”.
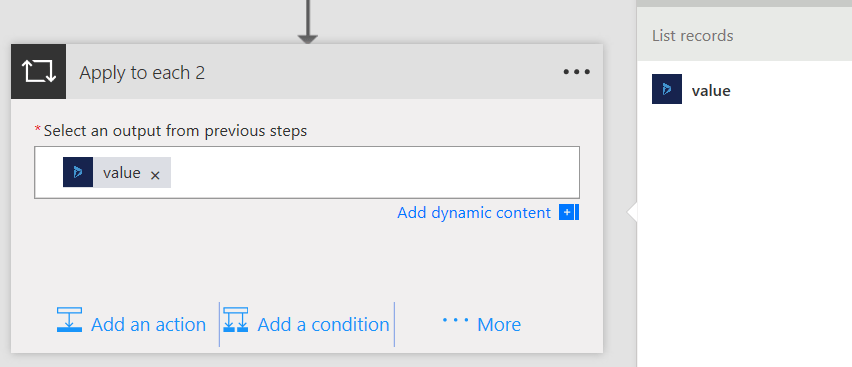
Figure 7 Apply to Each Action
This time, we’re going to update a record in Dynamics 365. Find the “Update a Record” action and fill it out to get the Contact. For the Unique Identifier, Automate needs to know which Contact to change. Since we’re in the middle of a loop that is going to touch every Contact in the list we made before, we simply need to tell Automate to look at the current Contact. To do that, make the Record Identifier filter refer to the unique Contact ID from the “List Records” step from before.
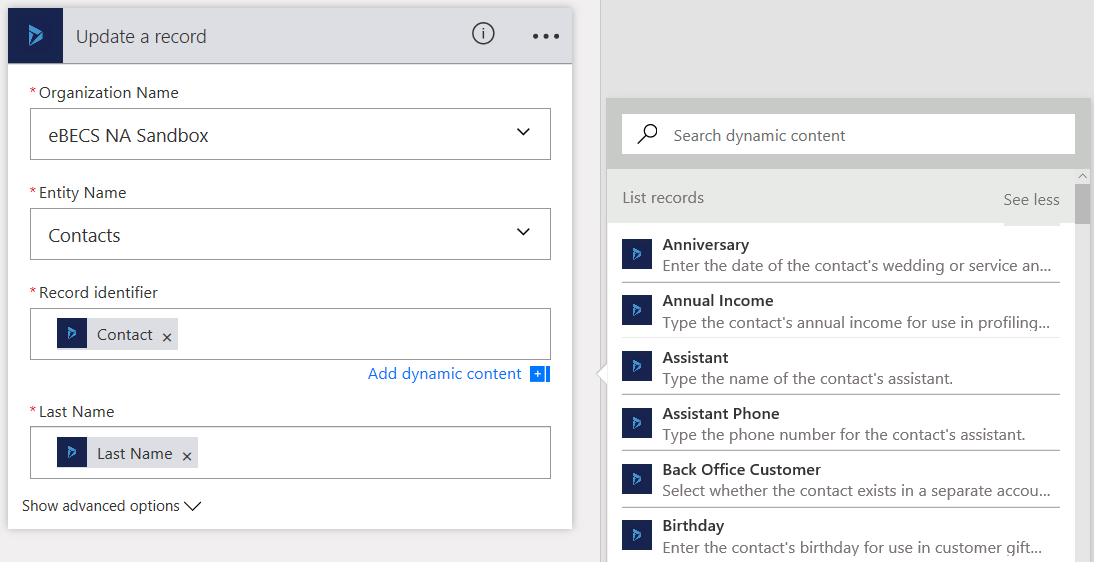
Figure 8 Update the Contact
There is one quirk to updating records in Dynamics 365 from Automate. If you have fields set to “required” in Dynamics, you’re going to have to fill that field out, even on a record that already exists. In our case, the Last Name field is required, so we’re going to get the Last Name field from our List Records step and re-fill it.
But that’s clearly not everything we want to do, here. To update any other fields, “Show Advanced Options”. This is a big, unwieldy list that sadly isn’t alphabetized. The best way to find something in it is to use your web browser’s search function and look for it that way. In our case, we want to update the Business Phone on the Contact with the Main Phone on the Parent Account. This is a very easy process, as all you need to do is find the Main Phone in the Account step above and insert it into the Business Phone field in our Update Contact step we’re currently working on.
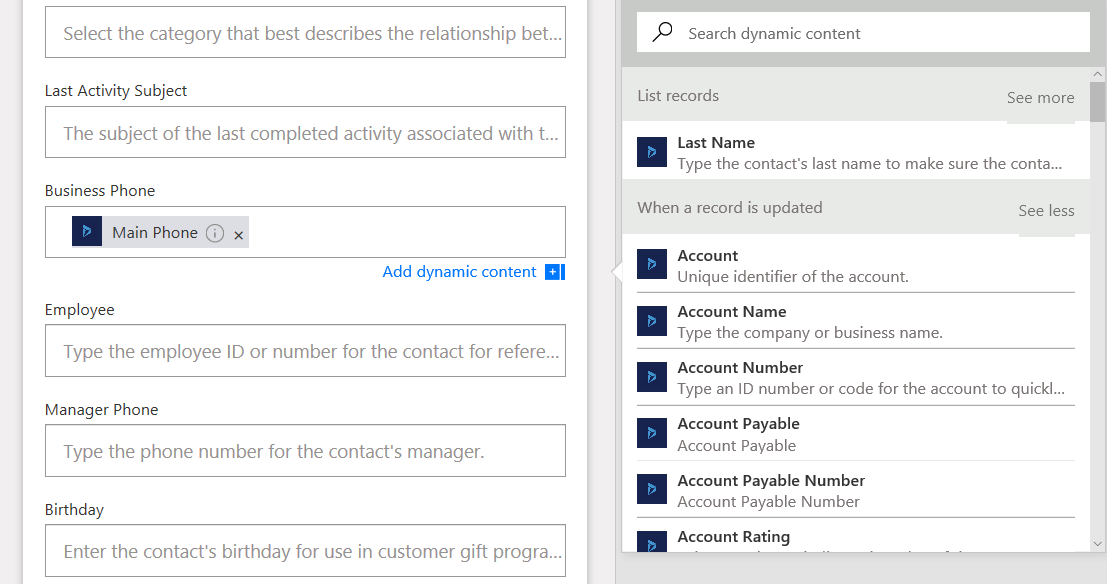
Figure 9 Update the Contact’s Business Phone
That’s it, our Automate is done. Just name your Automate and click “Update Automate” to save it and turn it on. When collapsed, our Automate looks surprisingly small. Of note, you can also rename individual steps, which is very useful when you have longer Automate’s that repeat the same types of actions.
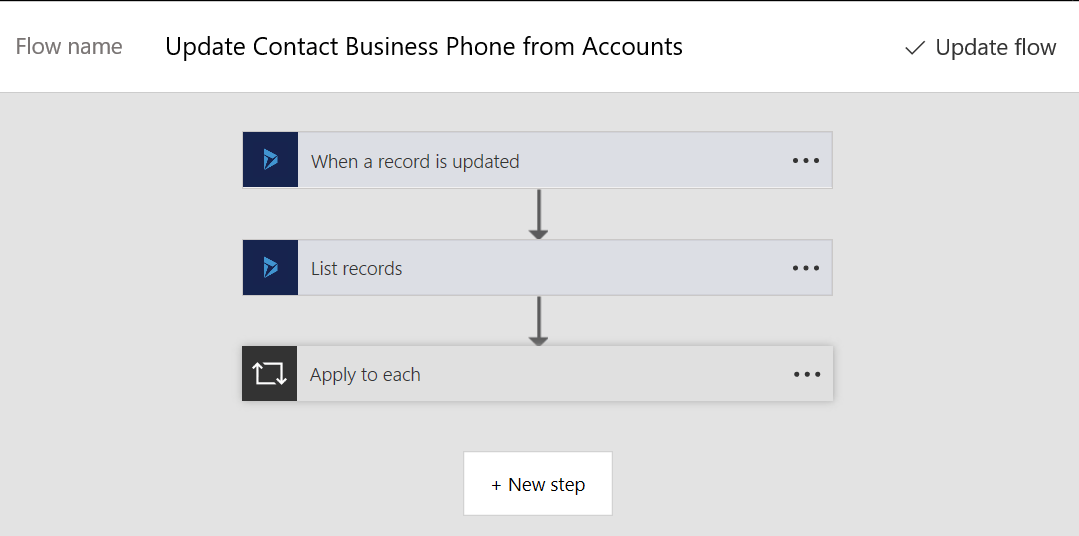
Figure 10 Collapsed Automate
Now to test our Automate. Go to the Dynamics 365 instance you pointed your Automate at and update an Account with child Contacts. If we did everything right, we should see the Contacts’ business phone number updated after changing the Account’s main phone number. Note: Flows are asynchronous, so it might take a minute to kick off. Also, the free version of Flow has lower priority, and can take longer to run than the paid version.
But what if it didn’t work, and you don’t see your changes on Contacts? Let’s look at troubleshooting. On your My Automate’s page, the far-right button is how you see the results of the Automate.
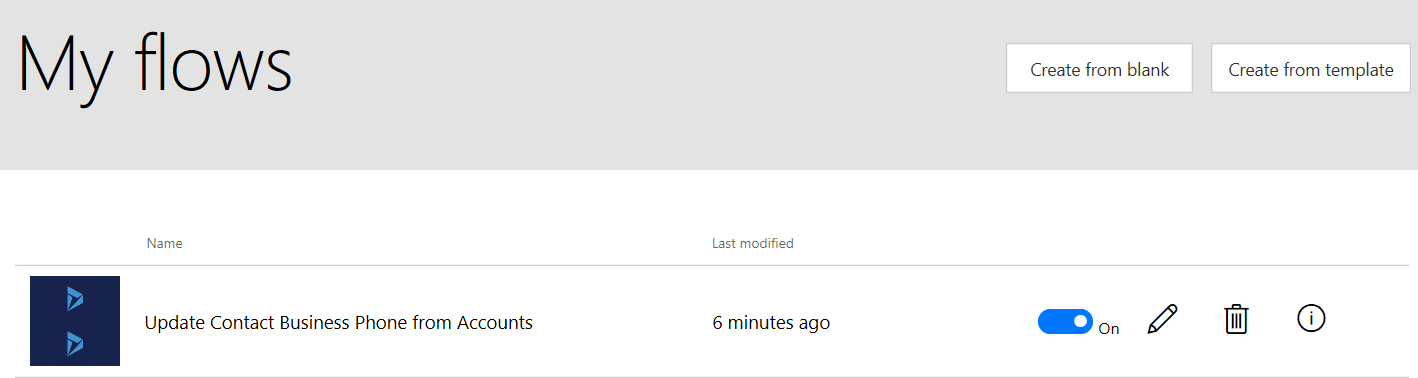
Figure 11 My Automate
In this case, I have one successful run. Note: if you change your Automate, this history is removed! So make sure you get your troubleshooting details before changing your Flows, or you will lose this history.
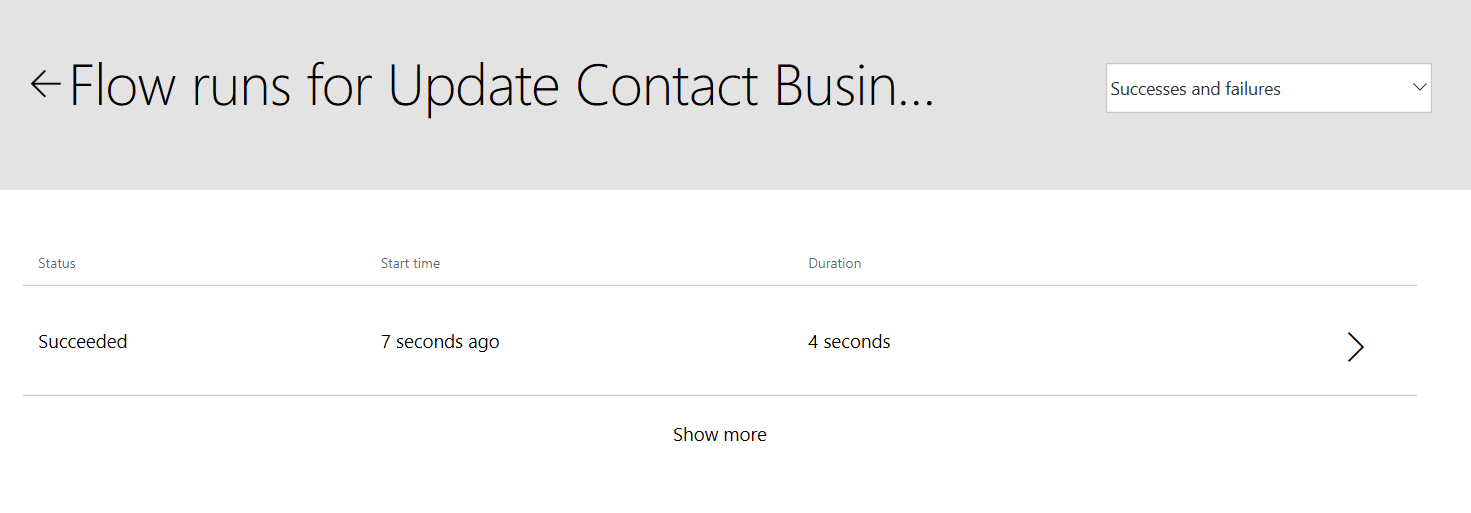
Figure 12 Automate Runs
Clicking the right arrow on an individual run will bring you to the details for that run. Green checks are for successful steps; red exclamation points are for failures. Grey steps never ran at all. This will be common if you ever write branches. Or in my example below, if the step isn’t valid – I ran the Automate against an Account with no Contacts, so nothing after the first Account step happened.
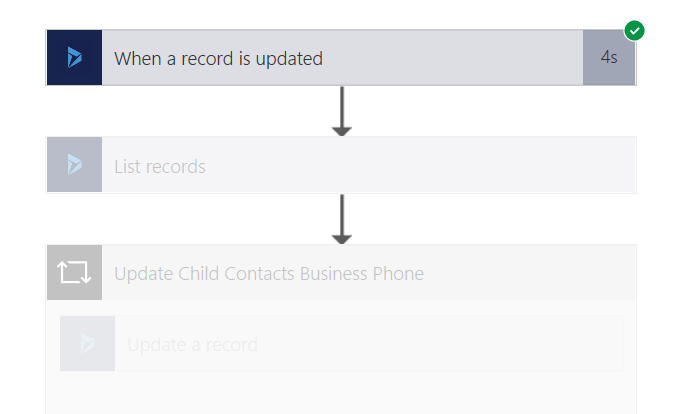
Figure 13 Individual Automate Run
Each individual step lets you see the details of what happened. This data is raw, however, so getting a developer to help troubleshoot isn’t unreasonable. As you can see below, the Automate literally gives you the raw data of what happened. It’s extremely detailed, but sometimes hard to decipher. Now you have everything you need to fix a Flow that isn’t working.
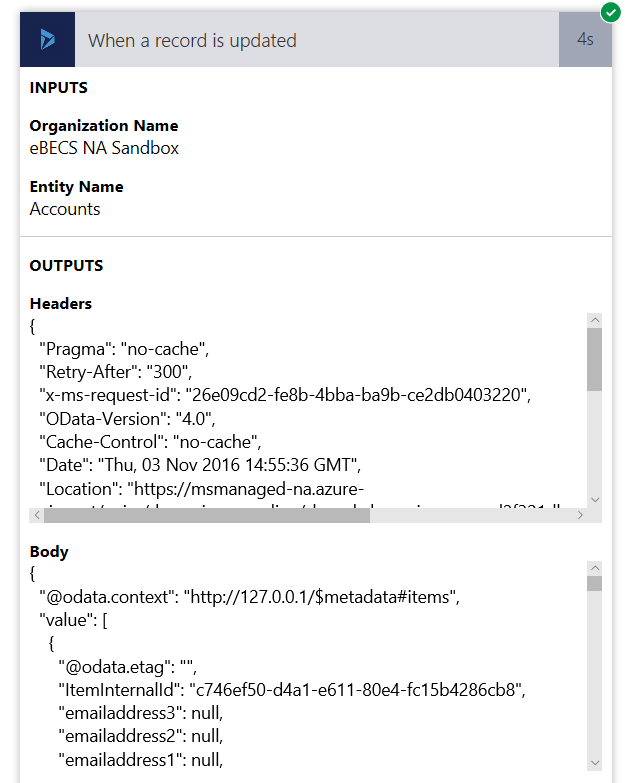
Figure 14 Automate execution step details
Microsoft Power Automate versus Logic Apps
As mentioned above, Automates based on Azure Logic Apps. We can discuss Microsoft Flow and Azure Logic Apps together because they are both configuration-first integration services, which makes it easy to build processes and workflows and integrate with various SaaS and enterprise applications. This also means Connectors that are built for one work for both.
eAutomate’s empowers any office worker to perform simple integrations (e.g. get SMS for important emails) without going through developers or IT. On the other hand, Logic Apps can enable advanced or mission-critical integrations (e.g. B2B processes) where enterprise-level DevOps and security practices are required. As anyone who has ever built a business-critical Excel worksheet or Access database can tell you, workflows tend to get more complex over time. Unlike those standalone applications, the increase in complexity doesn’t mean a nightmare for your IT team. When it no longer makes sense to keep a business process in a Flow, convert it to an Azure Logic App and allow your dev team take it over without having to rewrite the whole thing.
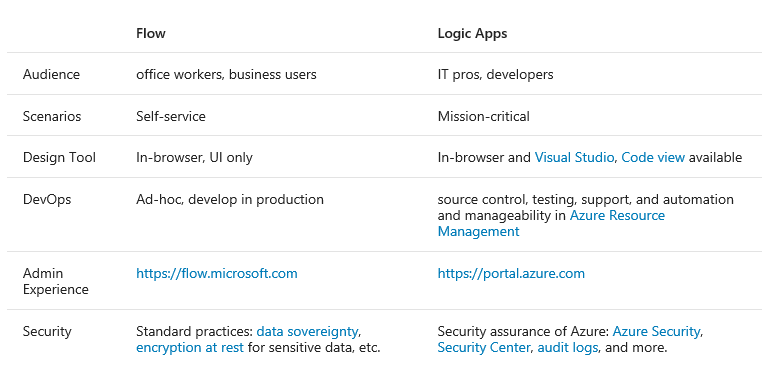
Figure 15 Microsoft Automate and Azure Logic Apps comparison
You can find more information about Power Automate versus Logic Apps here.
What’s Next with Power Automate’s?
Microsoft Power Automate’s are brand new, and the current state of documentation reflects it. The Documentation around Automate’s handles the basics, but isn’t nearly as deep as more mature applications. (https://flow.microsoft.com/en-us/documentation/getting-started/) In fact, Power Automate is rapidly getting updated, even though it just was released. The Power Automate Blog is a great resource to keep current when Microsoft adds new services or functionality: https://flow.microsoft.com/en-us/blog/ However, the best learning comes from making Automate’s. The Template catalog is a great way to use what others have already created, or to find inspiration to solve your own problems: https://flow.microsoft.com/en-us/templates/
Since Power Automate takes advantage of an Agile release schedule, updates are rapid, and relatively small. Over the next few months, numerous updates are planned, as per the roadmap below.
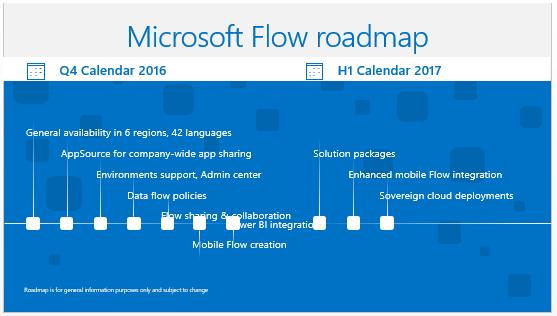
Figure 16 Microsoft Power Automate Roadmap
Power Automate have great potential to simplify and streamline business workflows between systems. Even in their current immature state, there is a whole lot of value-add for businesses, and for Microsoft Partners. Combined with PowerApps and PowerBI, Microsoft has created a business platform to enable business analysts and power users to build line-of-business solutions that still respect your organization’s data security and quality needs.

Get in Touch
Email or call us now to
discuss how Microsoft
Business Solutions can
improve your business


